Turn a Tube Sock Into a Microwaveable Scented Heat Pack (Video)

tube-sock-heat-pack-edited

Anxious much? Let this heat pack enfold you in its toasty, rice-weighted, aromatherapy embrace. There there, now. It’ll be ok.


IN THIS ARTICLE:
Heat packs soothe both body and mind; pssst, there’s
an even easier way to make it*


Ah the microwaveable scented heat pack. Humble as it is, I’d put it on a very short list of luxuries that cost next to nothing. But what if you don’t have sore muscles? Doesn’t matter. All you need are muscles.  You’ve got muscles, right? And daily emotional stressors too, I’m guessing? Well, you’ll benefit from this, trust me — especially on a chilly evening. Just nuke it, drape it round your neck and shoulders, light some candles, and succumb to your handmade heatpack’s warm embrace. Continue reading

easy DIY: scarf to kimono-esque cardigan

Image 16

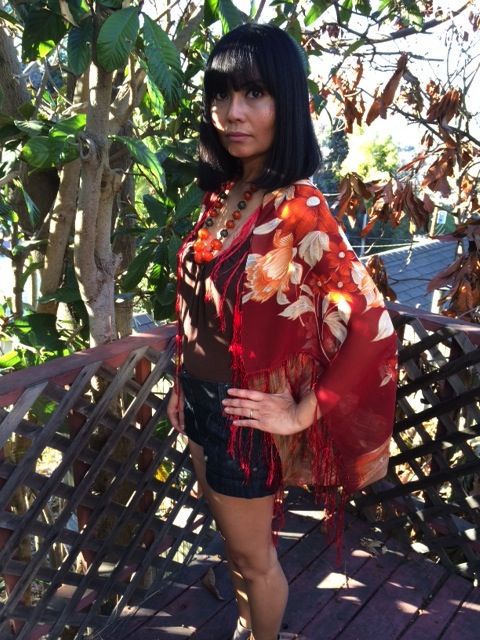
Whenever I’m out shopping, I find it extremely difficult to resist the allure of a scarf with a particularly beautiful colorway and print. The result? A scarf drawer crammed to capacity, with many a silken or sheer square buried and forgotten beneath the ever-growing collection. I always knew that these lovely, neglected pieces of fabric presented a prime DIY upcycling opportunity — I simply needed to figure out what that opportunity was. Now I know! After stumbling upon a couple tutorials (here and here) for turning a  scarf into a kimono-style cardigan, I made my own version using a sheer, rust-colored, fringed scarf I brought home as a souvenir from Barcelona.

I can’t adequately stress how painless this project is. You don’t even need a sewing machine. In fact, all you’ll need is a needle and thread and the ability to hand stitch a straight line. So fool proof, it’s silly. Just fold a large square scarf in half. Then, with the folded side at the top, seam the right and left edges about halfway up from the bottom. See figure below. Voila. You’re done. Open it up, stick your arms through the armholes (i.e. the unsewn edges), and let your cardi drape around you for effortless, slouchy, boho fabulousness.

Screen Shot 2014-01-14 at 5.46.51 PM

Image 15 Image 17 Image 13

Super Easy DIY: How To Turn a Scarf Into a Kimono-esque Cardigan

Image 16


IN THIS ARTICLE:
that a-ha moment of upcycling inspiration,
achieving boho fabulousness in 5 minutes


Whenever I’m out shopping, I find it extremely difficult to resist the allure of a scarf with a particularly beautiful colorway and print. The result? A scarf drawer crammed to capacity, with many a silken or sheer square buried and forgotten beneath the ever-growing collection. I always knew that these lovely, neglected pieces of fabric presented a prime DIY upcycling opportunity — I simply needed to figure out what that opportunity was. Now I know! After Continue reading

Handmade Christmas Gifts & Some Big News

Little Bailey in her teddy bear hat, courtesy of Auntie Homebody.

The jury is in and I’m guilty of being the world’s laziest blogger. I’ve been happily unemployed and crafting…and not updating my blog. Without an excuse in the world. Anyway, I’ve got a few handmade Christmas gifts to report, which I shall do. Continue reading

the curious craft of baking buttons

After quite a bit of online research regarding all things polymer clay, I’ve finally taken my first leap into the medium — crafting homemade buttons. I started out with some el-cheapo clay (Sculpey) which a lot of people apparently gripe about in terms of durability. But as I don’t plan on machine washing these buttons nor do I predict any delicate figurine sculpting in my future, I reckoned it was safe to take the thrifty route for my first attempt.

I thought that it would be a good idea to make molds out of some buttons from my stash, so I bought some of this molding compound which was super easy to use. I simply followed those abbreviated directions on the side of the box and it seemed to work fine. Thing is, though making the molds was easy, using them was another thing entirely. Too impatient to look up more online tutorials, I set my molds aside and proceeded to roll little balls of the clay and stamp them down into discs using some textured trinkets (pendants mostly) from my jewelry box. I made texture stamp molds of some decorative surfaces so the designs on my buttons would be in relief rather than in grooves (make sense?). I pricked buttonholes with a toothpick, baked them as directed, let them cool, and went to town with acrylic paint. Also decoupaged a few (like the green one pictured at bottom right below) with some ink-jet-printed tissue paper. I love the results! Really can’t believe how quick and easy these were to make. Now to practice my molding skills.

vintage pattern: simplicity 7522

Like most DIY addicts, my fabric stash needs some thinning out. So I dug deep and found that I still had a couple yards of that delightful, navy blue floral print jersey knit that I used for my bubble top. Since it has excellent drape, I picked a dress pattern from my (mostly untouched) vintage collection — a simple number with a unique criss-cross front wrap which ties in the back, creating a perfect fit regardless of weight fluctuations!  The resulting dress is a little bit country and a bit 90s grunge and it took about 4 hours total to make. I must say that I’m very pleased with it! Perfect for a  picnic or lunch date — and it also looks great paired with a long sleeve shirt beneath and some tights for cooler weather.


iPad purse & fringy triangle scarf

I was one of the many who couldn’t resist getting a 1st-gen iPad (even though I said I’d wait for the 2nd gen, as all new gadgets are not without their kinks) but impatience got the best of me. I’ve a notion, though, that one of the main reasons I wanted one was so that I could craft accessories for it. :-p

So, I made this little purse using some unused wooden handles that have been languishing in my closet for who knows how long, and some leftover Amy Butler fabric from my stash.

I also finished this fringed triangle scarf (or mini-shawl) that I made using Moda Dea Tweedle Dee yarn in Surf & Turf. Big needles + chunky yarn = super-quick projects. And we all love those!

my first baby…cardigan

Nope, I’m not expecting, but my sis is about to bear her first wee one, and so I thought I’d try to knit my very first article of baby clothing.

I found this cute pattern and got to work. I still haven’t gotten the hang of matching up the length of my vertical rows with my horizontal rows when picking up stitches, so my button bands/plackets are considerably shorter than they should be. Drat. Anyway, the little one should forgive me, this being my first attempt.

Lastly, my sis told me she was having a girl, and when the cardi was 90% finished, I came to discover that it was more of a hunch than a fact. Aye carumba! I told her that her baby was going to wear this pink ‘n’ purple number regardless!

tunic ‘n’ cowl

A new house, job, car…and a crazy 1 hour and 20 minute commute to and from work! Hectic indeed. Still, I haven’t lost my will to create–and where there’s a will, there’s a way. A couple weekends ago, I was able to make this jersey knit tunic in about an hour, primarily because I didn’t finish the edges. No matter. I’m all for that carefree, unfinished look.

And just this afternoon, I knit up this easy cowl in about a couple of hours with some yarn my sister gifted me from her stash. Believe it or not, Los Angeles is in the middle of a cold/rainy spell — the type of deliciously chilly weather which makes west-coast knitters like me very giddy. Used circular needles and alternated between a few stockinette rows and a few p2 k2 ribbed rows, decreasing circumference toward the center. Didn’t bother counting rows — I just eyeballed it as I went along. Coming soon: a striped baby cardigan — my first attempt at baby wear. 🙂

retro-glam kimono robe with obi belt

IMG_6536

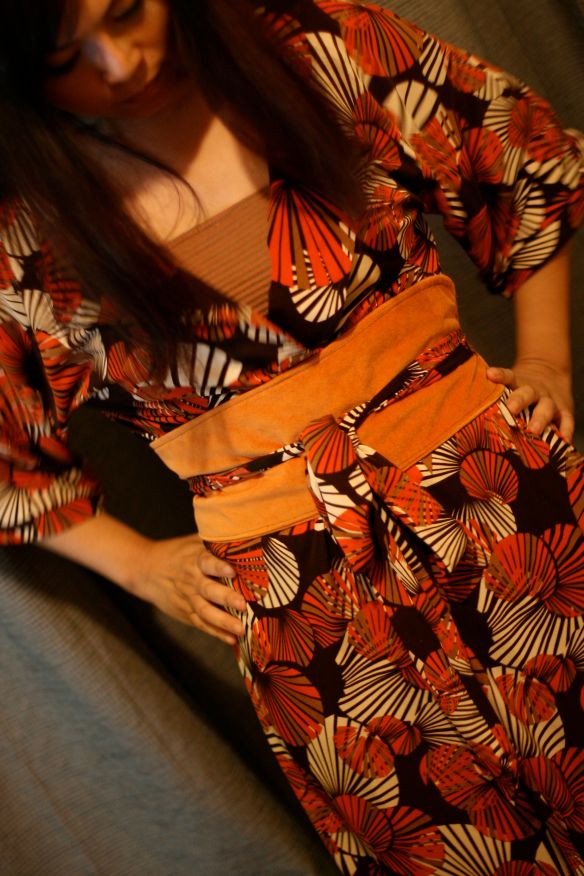
Finding myself with a few precious hours of free time, I got to work on a project that’s been brewing in my noggin for quite a while. My wardrobe is seriously lacking in the loungewear department, and I’ve always wanted something that I could throw on in the evenings and on lazy weekend mornings to make me look and feel instantly chic. Well, that’s the hope anyway! I’ve always loved the look of woven cotton yukata kimonos, so I thought that I’d do something similar with some stretchy knit fabric. I have a ton of the stuff because of an online sale a while back with prices too irresistible to pass up. I chose this orange-creme-brown print because of its ’60s feel — as I, like so many others right now, am obsessed with the Mad Men aesthetic.

I adapted this vintage caftan pattern (Butterick See & Sew line: 5836) and let the collars flop over to give my kimono a bit of a “westernized” look.

caftan

I couldn’t resist making an obi belt to complete the look.  Instant glam for the indoors!

IMG_6555

IMG_6551 IMG_6548