empire maxi-dress

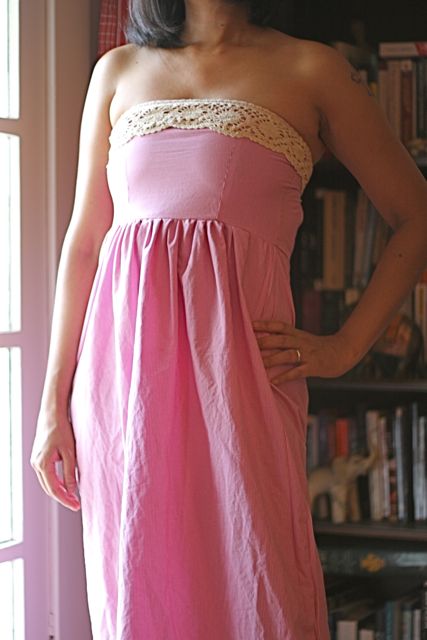
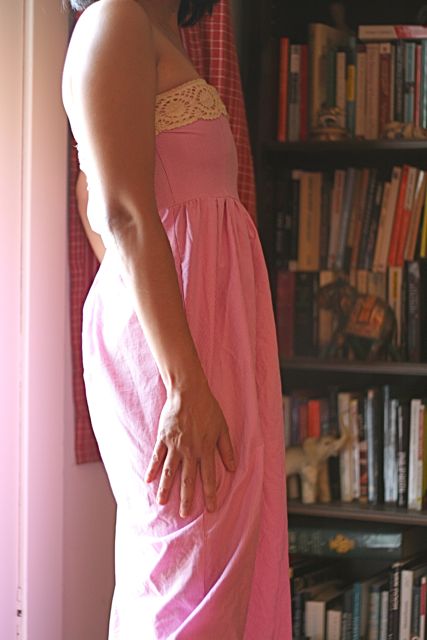
Just finished up the first dress I’ve ever made without the use of a pattern! Needless to say, I’m very excited and am wearing it with pride, despite the fact that the back looks a bit wonky and makes my bottom look two sizes larger. Hence, I’ve only given you front and (obscured) side view photos. 🙂 I made it out of a thrift store fitted bedsheet and based it on a sleeveless empire waist minidress from my closet, but decided to take it floor length for a dramatic maxi. I think it looks rather Jane Austen-esque with a touch of va-va-voom.

I spiced up the top edge with some crocheted trim I got from ebay.

I’m a bit late with my first creative endeavor for Oona’s “Week of Happy” — but I’ll see if I can rise to her challenge of creating something every single day for a week. Hmmmm. We’ll see how I fare…

Advertisement

playing with paint

After seeing this gorgeous stenciled blouse on Kasia’s blog, I was dying to try out fabric stenciling myself. So I went to Michaels and picked up some acrylic fabric paints, stencils and got to work. I have piles and piles of boring, solid color fabric that I got cheaply from thrift stores (various bed linens, curtains, etc) so I thought that this would be the perfect way to jazz them up. It took a bit of practice, as I foolishly chose to pay little attention to the warnings of experienced stencilers to not overload the brush with too much paint. Not a good idea, and as a result, my first attempt ended up in the waste bin. Too much paint will cause the color to bleed underneath the borders of the stencils. You really have to make sure that your brush is almost dry when you’re dabbing your paint on. Yes, dabbing (in an up and down, perpendicular motion) — as opposed to brushing. It takes a few coats (which can be a bit wearing on the wrist muscles) in order to achieve an opaque finish — but the outcome is quite beautiful, I think!

Here’s some stenciling I did on a wristlet pouch and basic tote that I made out of a couple of thriftstore bedsheets. I used Tulip brand Soft fabric paint.

lazy…so lazy….

I haven’t written a post for a while. No good excuses, really — I’ve just been rather lazy these days when it comes to crafting. To be honest, I just did a big house clean and I’m afraid of making a mess! So, these days, I’ve just been spending most of my time lounging around with a book.

Anyway, I did make a dress a couple weeks back that I posted on Burdastyle, but not here, so I thought I’d finally get around to it. It’s the Burdastyle Sadie dress that I made with some knit polyester that I got on sale for $1.99/yd. Of course I bought loads of it because I can’t resist a bargain. It was meant to be just a “test,” as I wasn’t quite sure whether I’d like the outcome or not — but as it turns out, I love it! So much so that I made one out of some jersey knit fabric as well (sorry, no pic). As you can see, I’ve not finished the edges since this fabric doesn’t fray, and I sort of like that casual, unfinished look like you find on a lot of American Apparel clothing. Alright, alright — so it also appeals to my lazy sensibilities, but hey, it works! I wore it out the same day I made it and got loads of compliments. 🙂


it’s all on the wrist

I love looking at a pretty handbag as much as the next lady, but I certainly don’t love lugging one all over town, so I thought I’d try to find a pattern online for a wristlet purse that was just large enough to fit the essentials. Lucky for me, I found this awesome tutorial and have been making a bunch using my piles and piles of scrap fabric! The finished wristlet can fit my credit cards, cash, car keys, a compact and lip balm. Poifect!

feeling capricious

I finally, finally made the leap from being a vintage pattern hoarder, to an actual vintage pattern sewer! I’ve been wanting a pair of high waisted capris, so I went through my stacks and stacks of patterns and found this:

So I made View #2, but added a cuff and button at the bottom of the legs.

They came out ok, except I found out too late that the pattern was made to fit a woman of 5 foot 7 and up (were women taller in the ’50s?) and anyone below this height would have to adjust the length of the crotch accordingly before cutting the fabric. Needless to say, I ended up with a very saggy backside which I attempted my best to fix, but as you can see, my alteration skills are lacking. Ah well. Now I know better. Overall, it was a fun project which I’ll definitely try again.

i’ve got the dresses, now where’s the spring weather?

The weather here in L.A. has been a bit odd, to say the least. Heat waves one minute, showers the next. Anyway, when the sun finally decides to come round for an extended stay, I’ll be ready with these lightweight dresses. Perfect for the office, I think. Though I actually work in an environment where just about any outfit flies which is great for me as I detest office dress codes. Guess that’s one of the pluses of working in West Hollywood.

Anyway, like my easy floral Anda, these two were made in a snap. I was even more lazy this time around and didn’t even finish the hems and armholes, but it gave them a more casual look — and I don’t have to worry about unraveling with this material. I also used the leftover fabric from my Built By Wendy Tunic and my Dolman Top. I really need to use the fabric that I’ve got before purchasing more, as I’m really running into a space issue in my sewing area. Of course I say this having just placed another order for another few yards of knit jersey…

my first skirt

So I’ve been drooling over these high waisted pencil skirts on Burdastyle (designed by talented Burdastyle.com member Kasia) and decided that this was the weekend I would try it out myself. But, of course, not without my signature shortcuts. Yes, that’s velcro you see holding the front panel up. Dear Lord, you ask — why velcro? I was feeling lazy, that’s why — and I decided that I would rather spend my time playing Guitar Hero than measuring and making buttonholes. Hehe. Anyway, when the front panel is up, the icky velcro is virtually undetectable. The buttons are purely decorative and were taken from a jacket that, sadly, doesn’t fit me anymore.

I also messed up somehow while making the gathered hip panels. They ended up very poofy, so I was forced to take some fabric out of them for a better fit, giving me two extra seams at the sides. Pretty sloppy overall, but I think it’s a pretty decent first attempt! I have some baby blue stretch corduroy that I’d like to use for my second (and hopefully much better executed) attempt at this fabulously designed skirt. And, yes, I won’t be using velcro the second time ’round.

another weekend, another dress.

So with the weather warming up, I figure that a girl can’t have too many dresses–especially of the sleeveless variety. So I made this summer number using Built By Wendy #3835, but omitted the raglan sleeves to create this halter neckline. I seriously can’t move on from my Builty By Wendy patterns. They’re just are so versatile and easy to sew! The fabric with cool swirly print is a Marie Kelzer design which I was lucky enough to get in both purple and green–one of my favorite color combos.

The belt wasn’t part of the original design, but I’ve been seeing these terrific obi belts on Burdastyle like this one and thought that I needed to make a few of them for myself.

This weekend, I was also reacquainted with this blast from the past:

My friend Jed asked me if I’d had ever had an “It’s It” before, and I said “oh yeah, when I was a little kid and I remember loving them…do they still make them???” Well, thank you, Jed, for jogging my memory about these unbelievably yummy nostalgic treats. If you’ve never had one before, let me explain. An It’s-It is a scoop of all natural vanilla ice-cream sandwiched between two perfectly spiced oatmeal cookies, coated in rich dark chocolate, and then each and every one is kissed by the snack gods who sprinkle them with a mixture of fairy dust and crack.

Yes, folks, they’re that good. Pick some up today.

too lazy to knit…

…hence, I bought some ribbed sweater knit fabric and sewed it together! Much faster. This fun little cardi was made using the ultra simple Burdastyle.com Sarah pattern — altered a bit. The sleeves on the original are rather wide and require pleats. I decided that I wanted cuffs instead in a contrasting fabric, so I narrowed the sleeves toward the wrists for a batwing effect. Yeah, it was a bit tricky sewing with sweater knit fabric, but after some online research I found out that I needed to use a narrow zig zag when joining fabric. Some of my seams are a bit jagged and weird, but I steam blocked afterward which helped a bit. A close inspection shows that it’s far from perfect, but I still wear it proudly! I’ve still got quite a bit of this fabric left over with which I plan to make a simple boatneck sweater.